Introduction.
Almost all the camellia cuttings I have ever taken have been done between late July and late August. In my nursery days the big groups of plants we propagated were camellias, fuchsias and conifers. The Camellias were taken in summer and were rooted by mid winter when they were weaned off and replaced by conifers. The conifers were moved on in early spring to be replaced by Fuchsias. As it happens, the camellias could have been taken in autumn/winter with similar results but the conifers wouldn’t have succeeded in summer.
At a guess, most people reading this won’t have a mist system and I think it may be easier to take camellia cuttings in autumn/winter without one. Apart from the timing, everything else remains the same.
There are several methods available for propagating camellias but the overwhelming majority of those on sale in the UK will have been raised from cuttings. Cuttings provide a reasonably inexpensive and quick way to produce a saleable plant for the nursery or garden centre. Furthermore, the plants will usually be true to type and resemble their parents in all characteristics.
In principle, we take advantage of the plant’s ability to regrow missing parts, in this case a root system, by taking a shoot and providing it with an environment that is conducive to it surviving in good condition long enough for new roots to develop. The principle is very simple; in practice it is more complicated as there are many variables involved and getting each of them right will increase your success rate in terms of percentage take and quality of end result.
Cutting material.
Cuttings are taken from shoots of the current season that have finished growing and firmed up. The bark will probably have turned from green to brown. This may be available from late June to the end of August, depending on the season and the variety. Different varieties of camellias start into growth at different times from March into May. Typically they will make new shoots all over the plant of around 75-100mm in length. Poorly growing plants may only produce shoots of 25mm or less; strong growers may reach 150mm or more. Since we are aiming for cuttings around 75mm long, it is often the case that the shoot can be cut at the base of the current season’s growth. Where the shoots are longer than this, the cutting may be taken below a leaf, at a node. It is still the terminal 75mm or so that is used. Where growth has been very poor, very short cuttings may succeed, again taken at the base of the current season’s growth. Making a longer cutting by using some of the previous year’s growth is unlikely to succeed.
Cuttings can be taken later in the year, up until November. The same material is used but flower buds will likely have formed and should be removed. The shoot will have hardened up and will as a result take a little longer to root. If further growth has been made after August it is unlikely to be suitable for cuttings, being too soft, too long and with long internodes. I did a batch of 90 cuttings in late February 2019 and had 62 (69%) rooted and potted up by autumn. Most of the rest are still alive and may still root.
Care must be taken that at no stage does the material dry out. Ideally collect cuttings early in the day, placing them into plastic bags which have been wetted in advance. Keep them in shade. Write a label at the time of collection and be sure it remains with the batch of cuttings at all times.

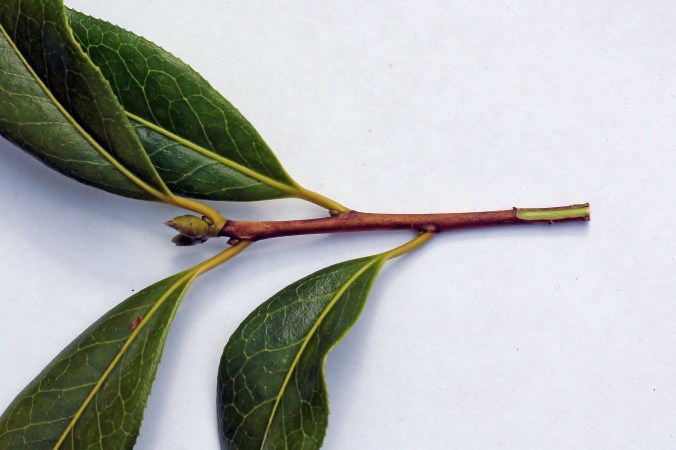
Camellia shoot from which cutting to be prepared.
a) Point at which cutting removed from bush.
b) Cut made here to produce cutting approx 75cm long.
c) Alternative cut position if shoot were longer.
d) This leaf removed.
e) This leaf probably kept under mist, otherwise removed.
f) Flower buds at early stage of development.
e) Vegetative buds.
Preparing cuttings.
Lower leaves are removed, leaving two or three leaves for most varieties, up to five for small leaved forms. Leaves are best left intact so as not to encourage disease. A clean cut is made with a sharp knife either just below a leaf or at the base of the shoot.
It is widespread practice to wound the cutting by cutting the bark off one side of the cutting for about 1-1.5 cm at the base.
Prepared cutting with wound at base. One or two more leaves could be removed.
The use of hormone rooting treatment is likely to produce a better root system on the cutting but won’t make something root that doesn’t have the capacity to do so. Professional growers usually use IBA, Indol butyric acid, whereas growers relying on retail products will find most products contain NAA, napthylacetic acid. Powder, liquid, gel and tablet formulations may be found. Cuttings should not be dipped into the main container: as much as needed should be tipped into a smaller container and any surplus discarded. Dry products will last for several years if kept dry, uncontaminated, air tight and cool.

Cell tray with 20 cuttings in Sylvagrow compost.
Once treated, the cuttings are stuck into trays of compost. Cell trays have the advantage of less root disturbance when potting the rooted cuttings up but the volume of compost available to each cutting is very small and drying out can be a problem, especially at the edge of benches or with bigger or leafier cuttings. I have found coir compost to produce good results under a mist system, it generally remaining moist from the mist without becoming waterlogged. Currently I am using Melcourt Sylvagrow compost and getting good results. Many substrates are used, with each grower having found something that works for them. Thus various mixtures of peat, bark chips, perlite and various other ingredients will all work provide that they provide support for the cutting and have a suitable balance between water retention and good aeration.
Cuttings should be stuck only deep enough to hold them vertical. Most root growth is from the basal 10mm of the cutting and strongly downwards. If the cuttings are stuck too deep or the rooting medium is too shallow, the rooting zone may be very limited.

Rooted cuttings showing root growth downward only from cutting base.
Rooting environment.
In a commercial setting the trays of cuttings are likely to be put onto a mist bench with bottom heat. An electronic “leaf” is placed amongst the cuttings; when it dries out a signal is sent to a controller which operates a valve and produces a burst of fine mist over the cuttings. The “leaf” is wetted, making a circuit between electrodes on its surface and the controller then stops the mist burst. Depending on conditions, the mist burst may be from every few minutes to every few hours.
Setting up a mist bench is quite costly and its relative complexity means there is quite a lot to go wrong. For small numbers of cuttings it is probably inappropriate and one very good grower of my acquaintance managed very well without. (or bottom heat either)
An atmosphere of 100% humidity can be provided around the cuttings by covering them with polythene. This could be a plastic bag secured with a rubber band over a pot containing a few cuttings, right up to low polythene tunnels 1-2m wide and many metres long. Polythene films are available specifically for propagation and may be clear or milky. Clear plastic hoods that fit a standard seed tray are readily available.
Shade from direct sunlight is essential. An unrooted cutting will not be doing a lot of photosynthesizing, so quite low light levels will suffice and in summer at least 50% shading will be in order.
Bottom heat is usually reckoned to speed root production and the combination of cool tops (from the cooling effect of evaporation) and warm bottoms, is supposed to be the winning recipe provided by a mist bench. I would caution against temperatures over 21°C as I am fairly certain that too high a temperature can lead to a lot of callus production which the new roots cannot then break through. It also increases the risk of the compost drying out, another thing I suspect encourages excess callusing.
Aftercare.
Camellia cuttings root very slowly so it is likely to be winter before they are rooted and early spring before they need potting up. A dilute liquid feed at 6-8 week intervals will prevent the cuttings getting starved over the rooting period. The rooted cuttings will then be potted into 9cm pots in a suitable compost and grown on for a season. I would leave cuttings in their cell trays until late winter even if they are rooted much earlier, not wanting to disturb and possibly damage the root system until it is poised to make new growth.
When roots are poking through the bottom of the propagation container they are ready for potting up. Sometimes a mass of callus is produced but no roots and it may be worth cutting much of this away, re-treating with hormone and sticking them back in the rooting medium.
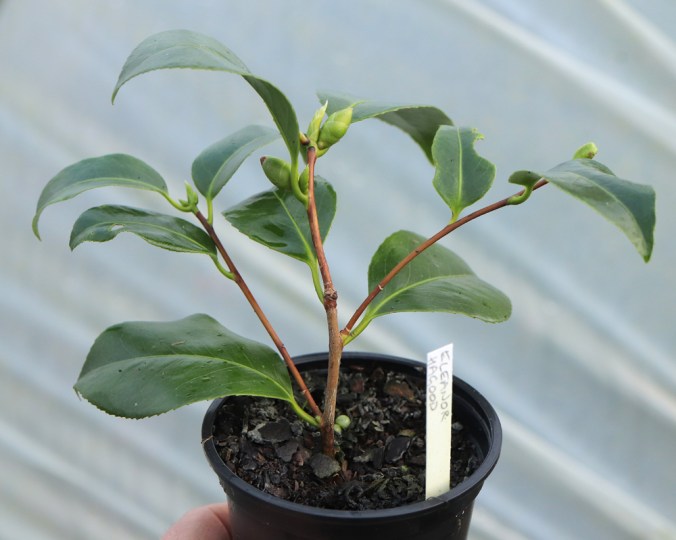
Cutting taken 31/7/2019, potted spring 2019. Photo 2/11/2019. A beautiful variety you won’t find in any UK nursery to my knowledge.
It is worth bearing in mind that camellia roots are much less hardy than the tops. Steps must be taken to prevent pots freezing as this is likely to be fatal.
There is a huge range of ease of rooting with camellias. At one extreme are the reticulatas, which if they root at all are likely to have poor, weak root systems. The reticulata hybrids can be almost as difficult and often produce very strong, thick shoots which are far from ideal propagation material. At the other extreme are modern varieties like Debbie, where 100% success is achievable. Very old clones are likely to be harder to root than younger ones. If a variety was raised 200 years ago, its physiological age is 200 years, even if you are propagating from a plant of it that is only 10 years old.
The most important thing, in my opinion, is to worry more about keeping the cuttings in good condition and less about trying to make it produce roots. Success cannot be guaranteed. If it is achieved, satisfaction can be.

Good report on propagation of camellia scions. I am a grower in central Florida. I am working on techniques to propagation relics. Thank you!
LikeLiked by 2 people
Very well described. You’ve identified what I think my past failures have caused by:
1. letting the clipping dry out in between collection and planting
2. using last years wood, not current year wood
3. setting them too deep
4. not keeping humidity high enough post planting
I’ve gotten a range of recommendations for starting soil. Most growers in the southeast US use a base of “pine bark mulch” amended with either perlite, compost, or fine sand, and they are started in flats outdoor, under shade cloth, with irrigation of some type mist or otherwise. Ratios have been 1:1 by volume pine bark mulch to perlite (dry) to 5:1 pine bark mulch to perlite. Fine sand and compost additions vary. I think the point is for hobbyists like me without frequent irrigation capabilities, selection of a heavier (wetter) blend is the right choice.
Thank you Jim!
James in Pensacola
LikeLiked by 1 person
Your point about the age of the donor plant is interesting and confirms what I suspected. Some years back I grafted material from a Capt. Rawes retic which was getting on for a century old.
The old boy has now expired – not entirely due to age – but that’s another story. The graft was successful and the plant produced a flower in the third year. But this the thing, the plant has not grown vigourously and I always guessed it was the ‘Dolly The Sheep’ syndrome – old material extends the old generation (with its infirmities) rather than producing a fit new one. In spite of the attention it has received the plant is a sparse grower with poor leaf and after about 8 years tops out at about 4 ft. Might get 6 flowers next year – if the buds stay on – Sussex not as balmy as Cornwall.
All the best Jim.
LikeLike