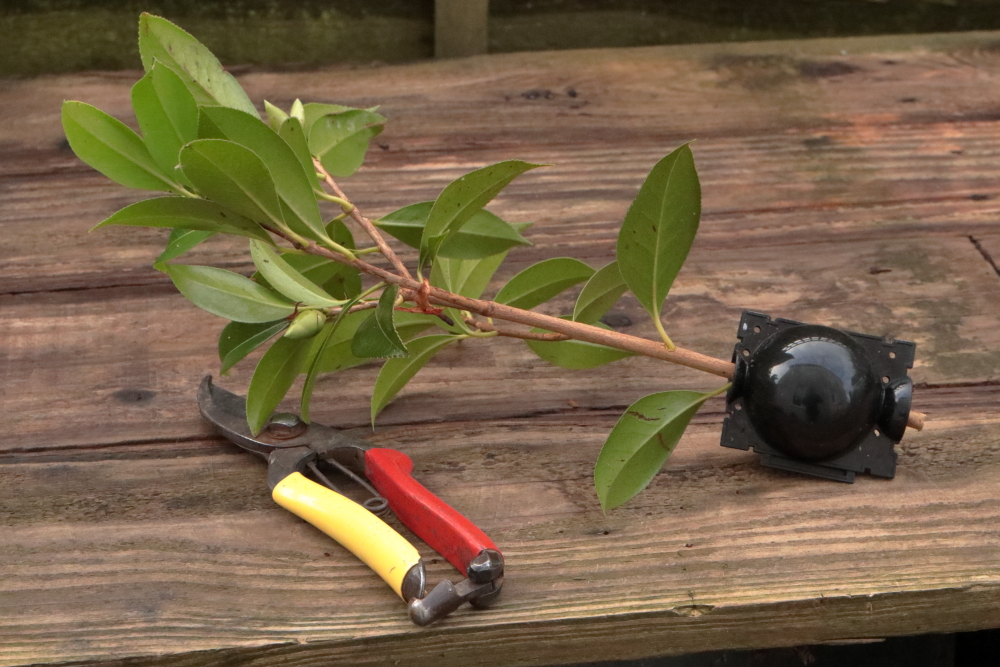
There are easier things to propagate than camellias. In my nursery days when I had access to the nursery mist bench, it didn’t seem at all difficult. For most varieties in most years, 100% success or very close was the norm for all but a handful of varieties. Then I retired and it all became more difficult. Not that I had any need to propagate more than the occasional plant, so even a low success rate would have sufficed. All too often I didn’t even get that, and eventually largely gave up trying. Then I discovered that they could be air layered using cheap plastic globes bought online.
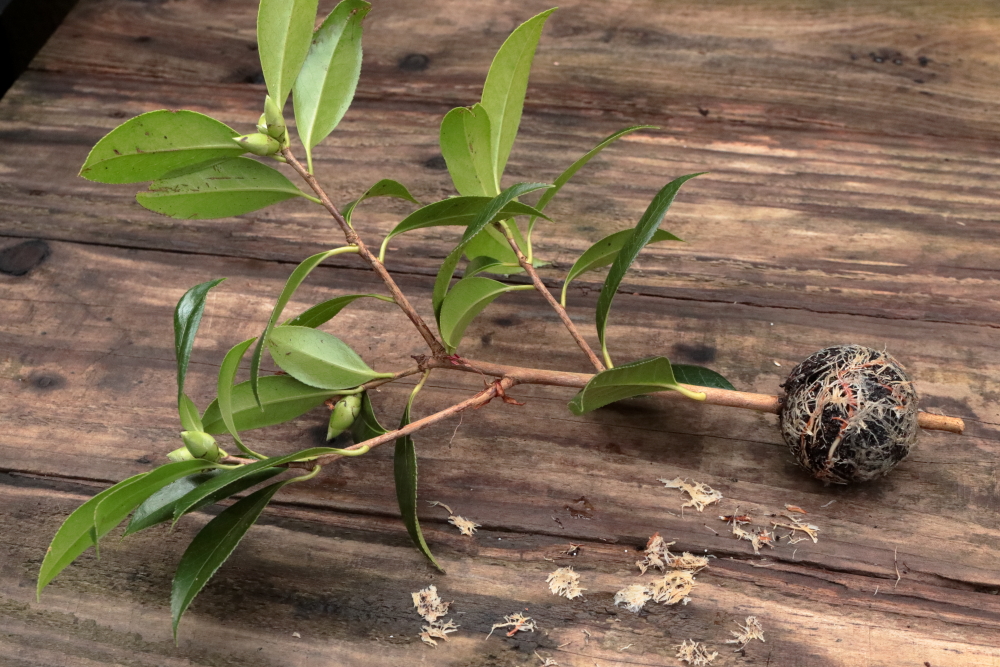
I took pictures of my early attempts and waited for the results to come. The first picture here was taken on 24th March 2023 and the second today, 28th November 2024. Two entire growing seasons have passed. I opened the thing up and there were roots, lots of roots. Time for the next stage; I cut the shoot from the bush.


I cannot remember when I last looked inside but it hadn’t rooted then. It must have been some while ago. The ball of roots was like a badly pot bound plant, the roots encircling the base of the shoot. I figured that if I potted it up like this the encircling roots would strangle the base of the plant and produce an unhappy, unstable plant. Something needed to be done.

With a very sharp knife I shaved about 1mm off the outside of the root ball, making sure that I severed the one somewhat stouter root that was encircling the whole thing. The roots would have run radially from the stem until they hit the wall and turned sideways. With the outer layer gone they can resume their radial growth. Nothing would have been gained by disturbing the root ball. Once I felt I’d removed enough of the encircling roots, I cut off the stem protruding from the bottom of the ball and shortened back the top growth to reduce water loss before the root system gets established properly. I then potted it into a one litre pot and put it in a shaded spot in the greenhouse.

This was only the second layer I’ve been able to remove from the parent plant. I think my big mistake was to put the globes onto stems that were too thin. The globe would allow the use of a stem up to 10mm thick, though there is a small tag that if not removed would limit it to around 7mm. I will in future aim for 5-6mm stems. Thinner stems allow the globe to turn more easily and seem to react by trying to callus and heal themselves rather than panic and produce roots to save themselves. I took the bark off about 1.5cm length of stem, packed compost firmly into both halves of the globe and shut it onto the stem where I’d removed the bark. Since roots will come from below the bark just beyond where it has been removed, that is the point that needs to be centred in the globe.
I clipped the globes with their own clip and tied them at both ends with thin plastic coated wire. All the globes I deployed were positioned in shade, I imagine they could get very hot in sun. The compost was very moist to begin with and I did water once or twice during the summer though without opening the globe up to see if it was needed.
The globes I used have a diameter of 52mm and allow stems up to 10mm to be used. A stem that thick will have quite a lot of growth on it, which will certainly need to be reduced before the layer is removed from the parent plant but may be an advantage up until that point.
I’m encouraged by such success as I’ve had and will do more, no doubt learning on the way about what gives the best results. Should I have cut into the stem? Would rooting hormone help? What is the best compost to use or would sphagnum moss be better? If I learn anything useful I’ll do a part two blog. In the meantime, if anyone has experience of this or similar techniques I’d be very glad to hear about it.
